Need Assistance? Call us today! 602-478-9713

The Bionator –
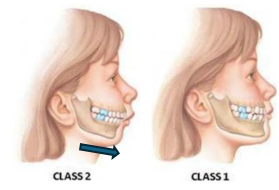
A Versatile Appliance for Class Two Correction via Mandibular Translation.
The Bionator has been an instrumental appliance in my practice for many years. In this era of airway focused dentistry and treating the structural causes of sleep disordered breathing, we find that mandibular entrapment is right up there with the most common of cofactors. As such there is great value in relieving that entrapment, often via maxillary arch development. Once the maxillary and mandibular arches are coordinated in size, it is often necessary to assist the mandible in its final path to ideal position for both temporomandibular joint function and maximization of pharyngeal airway volume. The Bionator may just be the tool you are looking for.
Much of what I hope to share with you in this article I have learned from Dr. “Skip” Truitt, a friend and mentor and certainly a pioneer in maxillofacial orthopedics and orthodontics. I will of course sprinkle in my own experience with the appliance over the last 15 years or so.
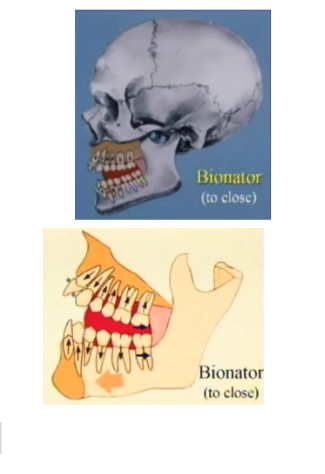
The Bionator was developed by German orthodontist Wilhelm Balters in the 1950s as a less bulky, more comfortable modification of an older “activator” appliance. Today, there are three basic designs for the Bionator: The Bionator to Open, Bionator to Close, and Bionator to Hold. Each of the names refers to the vertical dimension you want to achieve with the appliance. The Bionator to Open is used to distract and translate the mandible down and forward correcting a skeletal class II relationship and OPEN the deep bite. Similarly, the Bionator to Close will distract and translate and CLOSE the open bite and the Bionator to Hold is designed to hold the vertical dimension present in the case but still distract and translate the mandible. 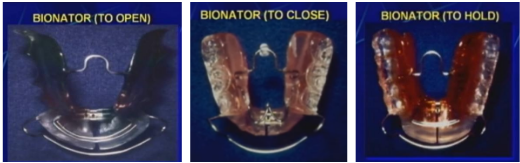
It is, of course, important to know when it is appropriate to use the Bionator. Most of our patients with retrognathic mandibles end up in that position as a result of mandibular entrapment. Structurally speaking, there are 5 clinical occurances that will trap the mandible back in position. These are, in order of prevelence:
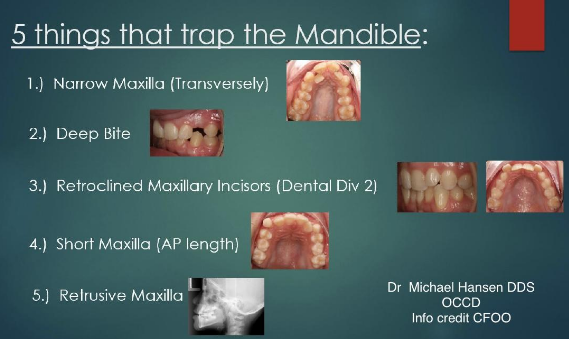
Once these entrapping factors have been mitigated with proper and adequate development of the maxillary arch, with the exception of the deep bite, then you are good to treat with the Bionator. A good rule of thumb is to have the patient posture forward and see if the arches align. This trick is best coupled with an evaluation of the Schwarz-Korkhaus dimensions of the case as these can be helpful guidelines for arch coordination but also give you clues about tooth angulation. Arch coordination of course is important because we do not want to position a mandible forward to couple with a maxilla that is too small in any dimension to properly join with it. At best we create unstable occlusion that will relapse when allowed to function and at worst we create a crossbite. But, once entrapment is relieved and arches are coordinated, it’s Bionator time.
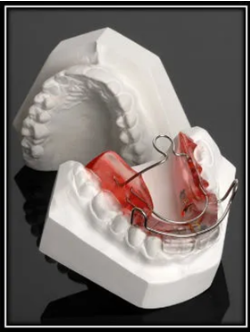
Let’s look at the Bionator to Open. It, like all bionators, is what is known as a demand position appliance. This means the appliance forces the patient into a certain position. Its value, uniqueness, and advantage over some other class II correctors is its ability to couple the upper and lower portions of the appliance together in one and maximize anchorage.
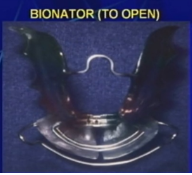 The Bionator to open is designed to translate the mandible, (bring the mandible down and forward) and open the vertical dimension. In it, we cap the anterior teeth with incisal coverage of acrylic, keeping the anterior teeth from erupting and allowing the posterior teeth to erupt and correct the VDO as we translate.
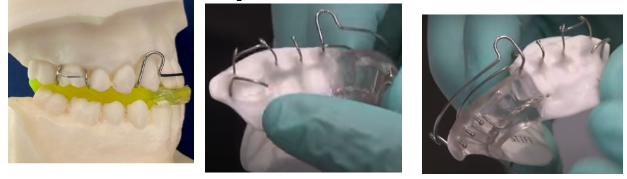
The Bionator to Open, like all Bionators, has flanges on the lingual to both block the tongue from engaging in the inter-arch space between the teeth and guide erupting teeth into position when the time comes. This can be a very effective tool against a lateral tongue thrust. Also notice that the palate is open, leaving room for myofunctional therapy to work on developing a correct tongue posture up in the palate.
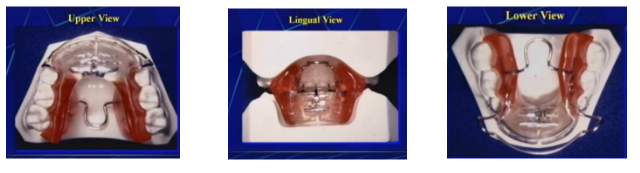 The posterior segments of acrylic are carried to the height of contour. This prevents the posterior teeth from erupting until we grind the acrylic away. This gives us more control as clinicians on how and when we erupt the posterior teeth. It also gives us the ability to stop the bite opening effect by halting the adjustment of acrylic when the desired VDO is achieved. All Bionators contain a transpalatal arch wire that connects the posterior segments of the upper arch and improves the anchorage against unwanted distalizing forces in the upper arch. The TPA is given an omega loop to allow us to relieve tension if the transverse screw should be activated. Otherwise it remains inactivated.
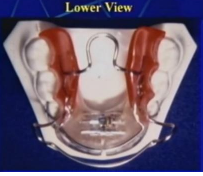
The transverse screw is placed in lower portion of the appliance to allow for minor transverse development enabling the keystoning of the mandibular canines if we missed the mark in our development phase. The rate of turning will depend on wear time. This screw should not be turned until after a 90 day holding period.
Wear time for the Bionator ideally is continuous, removing it only for eating and hygiene. When worn in this fashion it will produce translation and eruption at the fastest pace the body will allow (usually about 6 months). Typically the appliance is worn without adjusting any posterior acrylic for 90 days. This allows for better control of the horizontal forces as well as the muscle lengthening, and ligament orientation. While continuous wear is ideal for treatment, it is not ideal for many patients. The outcomes of Bionator therapy can be achieved with nighttime wear only as long as two points are understood. One, it will slow down the overall treatment time and two, there is a risk of arch collapse during the day if the tongue is not adequately supporting the maxillary arch. To mitigate this, I will have my patients in myofunctional therapy AND have them wear the Bionator during the day for 5 to 10 minutes periodically throughout the day. How periodically depends on the stability of the arch and how “tight” the Bionator feels in the mouth upon reinsertion.
In my practice the Bionator is used on the prepubertal patient. It is a fantastic appliance to hold the arch space, translate the mandible and alter VDO while transitioning the dentition from primary to permanent. It can be used on adults with success, but I often find other appliances that allow me to achieve these goals in the adult dentition while addressing other orthodontic needs and thus diminish the overall treatment time. But, there are situations where a Bionator can be a very appropriate choice in the adult patient.
The desired outcome of Bionator use is to translate the mandible. Dr. H.P. Bimler described mandibular translation as changing the size of the mandible and the position of the mandible relative to the cranial base. Mandibular translation ultimately is the term used to describe the movement, relative or otherwise, of the mandible from a class II to a class I. Depending on the age of the patient and the situation, this can happen any one of four ways or a combination of all four. If you look in the literature these changes are well documented. These are, 1) increasing the size of the mandible (Bimler), 2) Altering the shape of the mandible (Hans & Enlow), 3) Erupting the mandibular alveolar process (Woodside), and/or 4) Remodeling the condyle and TMJ (Wieslander).
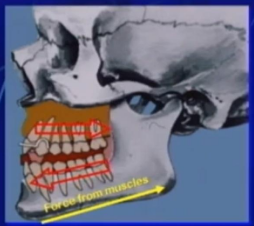
Horizontal forces are introduced with any class II corrector and the Bionator is no exception. The greater the distance to translate, the heavier the horizontal forces. These forces initially are produced by the muscles of mastication retracting in response to the new demand position. The forces produce a distalizing force on the maxillary arch, and a mesializing force on the lower arch. These forces tend to stay active for roughly 90 days. In most cases the forces on the teeth are not desirable, the forces on the bone are desirable. As such, proper anchorage must be attended to in order to mitigate the undesirable forces and their effects. Without accounting for these forces, they can result in a dumping or proclination of the lower incisors as well as a distalization of the maxillary posterior teeth. Because of its unique anchoring abilities, the Bionator sees minimal distalization of the maxilla and the maxillary teeth relative to other appliances.
Insertion adjustments for the Bionator to Open include adjusting the labial bow, to be in firm contact with the gingival third of the incisors, relieving the lingual acrylic contact from the lower incisors, and not adjusting the posterior acrylic (for the first 90 days).
The Bionator to Open contains a 0.040 Hawley labial bow, 0.036 lap springs, and a 0.044 Coffin wire for the transpalatal support.
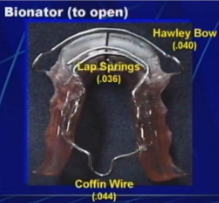
When seating the Bionator it is critical for the labial bow to be adjusted to be in firm contact with the gingival third of the maxillary incisors. When placed at the gingival 1/3rd the force is at the fulcrum of the tooth and will not change the tooth angulation but will maintain it while anchoring. If development left the incisors flared facially in a division 3 angulation, you can place the labial bar in firm contact on the incisal 1/3rd and retract the incisors. This of course needs to be monitored until the desired angulation is achieved. Once achieved, the bar is moved to the gingival 1/3rd to maintain angulation and anchorage.
The labial bow is adjusted typically with reciprocal adjustments with a 3-jaw plier.
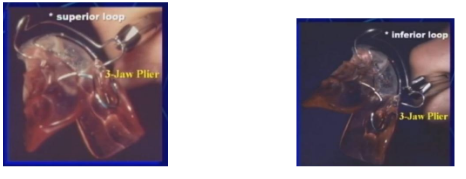
The activation as shown on the left with the 3-jaw on the superior loop will pull the bar in lingually insuring firm contact with the teeth. The activation shown on the right with the 3-jaw on the inferior loop will pull the bar gingivally to ensure maintainance of the tooth angulation and anchorage. To undo the activation simply place a flat on flat plier in the same place and squeeze gently until you have the desired position.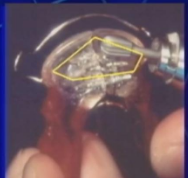
If angulation of the lower incisors is ideal when you first seat the Bionator, you will want to relieve the acrylic from the lingual of the lower incisors to prevent the horizontal forces from dumping or proclining the lower incisors. If, on the other hand you have retroclined lower incisors (say from a digit habit) that you did not fully correct in the development phase, it is then desirable to leave the lingual acrylic in contact so as to correct the lower incisor angulation through proclination from those horizontal forces. Once the angulation is ideal, simply relieve the lingual acrylic to maintain the desired angulation. In either situation, it is important to leave the incisal cap of acrylic to control the VDO.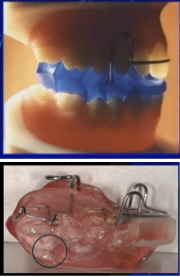
The lab fabricating the Bionator should leave the lower lingual intaglio unpolished with a matted finish. After the 90 day holding period the lower posterior teeth will have polished the areas on the acrylic they contact. This will be where we adjust, at the heights of contour, to allow eruption to happen that will correct the vertical dimension. If done correctly, after some experience, this can be a one time adjustment. Until you get a feel for this, you may want to see the patient every 3-4 weeks to adjust incrementally at the shiny areas until the desired VDO is achieved.
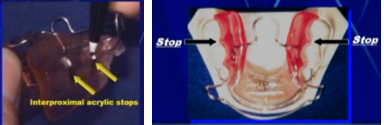
This adjustment can be modified to create mesial stops for the molars or premolars to prevent arch length loss from mesial drift in the appliance. Not preventing mesial drift can lead to arch length loss (posterior teeth incorrectly forward in the arch) that will greatly complicate the orthodontic finish. Often if there was a great deal of development done to the maxillary arch, the demand position will create a dental class III relationship. In that case the maxillary stops can be relieved to allow mesial drift and correction.
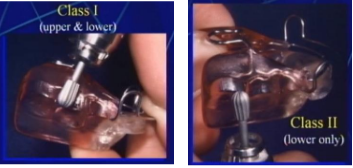
The specific adjustments made to the posterior acrylic highlight the Bionator’s versatility. In general, the lower acrylic is relieved, using the wear facets as a guide in the skeletal class II patient. Both upper and lower acrylic are adjusted in a skeletal class I patient. Occasionally you may come across a pseudo class III, this is a class I that may have an extreme curve of Spee and/ or an extremely deep bite causing the illusion of a class III (much like a denture patient that has lost severe VDO). In that unique situation I can only adjust the upper acrylic and allow the maxillary posteriors to erupt vertically to support the vertical dimension. The important point to understand is that the Bionator is ground according to the skeletal class of the patient. However, a combiniation of these methods can be used to adjust or treat a cant in the occlusion by relieving mandibular acrylic on the low side of the cant, maxillary acrylic on the high side of the cant. Or, you can continue adjustments on the low side and stop adjusting the high side when molar contact is achieved on the high side but continue adjusting the low side and allow the low side to continue erupting until level. Which you choose will depend on the skeletal class and the curve of Spee. To aid in speed and predictability of eruption, place separating elstics mesial and distal to the teeth you want to erupt.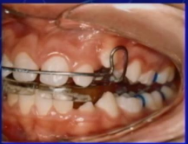
Another helpful feature of the Bionator is the addition of lap springs. These can be helpful if the upper incisors did not straighten or if the division 2 retroclination of the incisors was not fully corrected in the development phase. It is also applicable if we over tightened the labial bar and created a division 2. The lap springs are activated by gripping the wire with a Jarabak plier and pulling toward the lingual of the incisors aproximately the width of the bar itself. This can be continued monthly until the desired angulation is achieved. 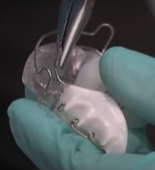
Retention for the Bionator can be as variable as the clinitian desires. The original Bionator was a floating appliance that uses the acrylic contours and tight contact of the labial bow as the retentive features. Many practioners, including myself, prefer to have an adams or delta clasp on the upper 1st molar. Perhaps one of the most retentive designs is one from Dr. Derek Mahony with Delta clasps, ball clasps and C clasps. When managing the case, you have to make sure that your retentive features are not interfering with the goal of the appliance. Many clinitians will start with maximum retention and then start removing clasps as they hinder the goals.
Derek Mahony with Delta clasps, ball clasps and C clasps. When managing the case, you have to make sure that your retentive features are not interfering with the goal of the appliance. Many clinitians will start with maximum retention and then start removing clasps as they hinder the goals.
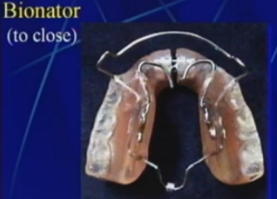
Now lets talk about the Bionator to Close. The bionator to close has many similarities to the Bionator to open. It has the same labial bow that needs to be in tight contact with the incisors, same rules apply in regards to lower lingual acrylic in terms of relief of lingual contact. However differneces in design revolve around the goals regarding the management of the VDO. The class II open bite is typically caused by a low and/or forward resting tongue posture and anterior thrusting swallow that results in an anterior open bite and excessively errupted posterior teeth. The design of the Bionator to close targets these things. It has a posterior cap of acrylic with an open anteiror. This allows for the intrusion of posterior teeth, the eruption of anterior teeth, and an autorotation of the condyle as the VDO closes. These patients will often be functioning off the disc as the thrust creates reciprical distalizing forces on the condyle to mesially displace the disc. We will often see an initial and rapid improvement in bite closure in these patients. This is typically attributed to the autorotation of the condyle back on the disc (or articular cartilage for the pediatric patient). The remainder of closure takes longer and is attributed to the intrusion of posterior teeth, eruption of anterior teeth and a realigning of the cranial sutures. The Bionator to Close will often contain a posterior myo bead to intice tongue lift and tongue wires bent to guard against tongue thrust and/or forward resting tongue posture. Unlike the Bionator to Open, it does not need adjsutment of the posterior acrylic. As such, it becomes more difficult to correct a cant. One side can be thinned relative to the other but it needs posterior pressure for optimal closing effect.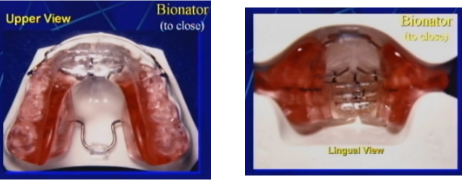
Just remember the more you close the vertical dimension, the more the condyle is rotating forward on the disc. That is why a skeletal class 1 open bite is never repositioned, and a skeletal class 1 deep bite is always repositioned (details to come when we discuss the construction bite).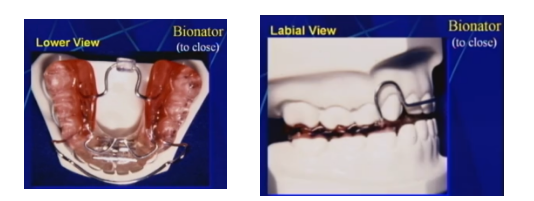
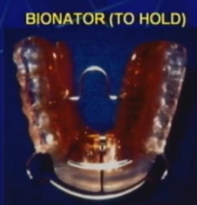
Rarely seen but equally important is the Bionator to Hold. I say rare, because we just don’t often see clinical scenarios where the vertical dimension is ideal but only the AP position has been affected by the derrangements that led to the retrusive mandible. However, when you do come across one, it is good to know how to translate without altering the VDO. In this scenario we cap both the anterior and posterior.
When fabricating a Bionator, it is helpful for the lab if you will send a construction bite (digital or otherwise). The nuances of the bite will vary depending on the type of bionator you are going to use. This is where the Ceph tracing can be helpful because we can determine from it the predominant direction of growth. For example if the Ceph suggests the patient is primarily a vertical grower, the bite will open faster than the mandible will translate. If they are primarily a horizontal grower, the mandible will translate faster than the bite will open. Once we get a good feel for this we can alter the construction bite accordingly. It is important that the bite is made with condyles correctly seated on the articular disc. Typically, having the patient open as wide as possible and positioned vertically (not leaned back in the chair) when making the construction bite will ensure this. It is also critical that the skeletal midlines are aligned in the construction bite. Many times through the course of dysfunction the dental midlines will drift to accommodate the skeletal shifts. It is important to correct this to prevent future TMD concerns. Typically, the mid palatal sututre and center of the face are good markers for the maxillary midline. The lingual and labial frenums mark the mandibular midline.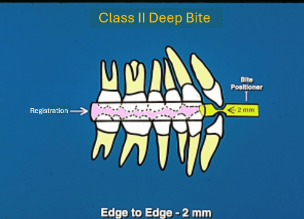
In general, when fabricating a Bionator to Open, (correcting a deep bite) it is ideal to position the mandible so that the incisors are end to end and separated by 2mm. Both the positioning and the separation can be made with a proper bite stick or jig. There are several graduating types on the market. In general I prefer the type that have notches for forward positioning but the articulating surface is rounded to allow pitch, yaw and roll of the mandible as it finds its forward position.
To create a bite construction for a skeletal class I deep bite patient we perfom the same steps for a skeletal class II patient but increase the VDO to 4mm at the incisors. In the case of the skeletal class I deep bite we can open the vertical more and get to the finish line faster because we know we are looking at a mild or pseudo class 2 and there is little translation that has to happen and mostly just vertical opening that is desired.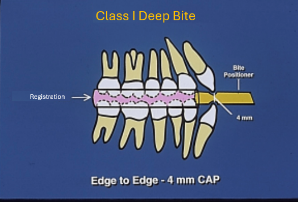
Creating a construction bite for the open bite patient is more challenging but many of the same rules apply. We still want skeletal midlines lined up, condyle on the disc, and positioned end to end in the AP dimension. The difference of course is that the patient usually can’t achieve an end to end contact with the incisors. In this case we still use a graduated bite stick or jig but we only open them wide enough to achieve a 1.5mm clearance of the most posterior teeth. This ensures we have adequate thickness of acrylic to withstand the occlusal forces with the least amount of bite opening. To achieve this we may have to add bite registration or compound to the jig.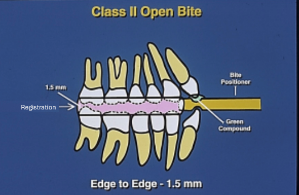
There are some final adjuncts worth talking about. As the Bionator is often a final orthopedic appliance, there are some addtions that can be made to aid in the finalization. Whenever possible, finalization of tooth positions should be done prior to the bionator phase. But in those instances where it just didn’t happen you can add them to the appliance. For example, if the lower incisors are not in an ideal position, you may choose to leave them that way for the first 90 days for added retention, then use lap springs or a finger spring to correct their position. Or, you can adust the dental midline with a cross-over wire. When doing this you have to make sure to clear a path for movement in the acrylic.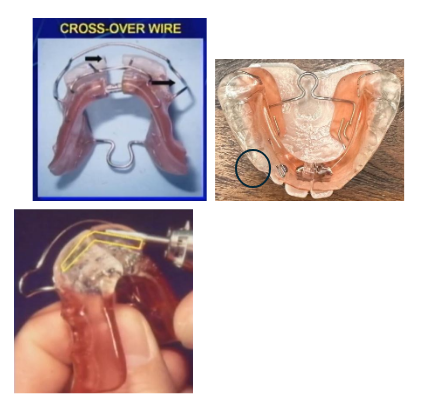
Another adjustment that is sometimes needed is a subsequent adjustment of the acrylic contacting the linguals of the lower incisors. If this has been done once already but the lower incisors start to procline it means they are again in contact with the ligual acrylic. This can be attributed to shifts that happen in the cranial sutures as a consequence of the various pressures the Bionator places on them. Simply relieve the acrylic again and the proclination will stop. But, this is another reason why the Bionator should be monitored monthly.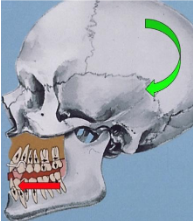
Once the desired movement, tooth angulation, etc. has been achieved, retention is the next step. This can be accomplished by converting the bionator into a bionator to hold or move to a lower lignual holding arch and an upper nance or Hawley. Myofunctional therapy is the key to long term stability and should be part of the regimen. If some of the malocclusions return it means the myofunction has not been habituated. The patient may need to return to myofunctional therapy and the Bionator inserted again.